

Testing software is essential to ensure its functionality, reliability, and overall quality. It helps identify bugs or errors early, reducing the risk of failures and saving time and cost in the long run. Proper testing also ensures that the software meets user expectations and works as intended in real-world scenarios.
While this applies broadly to any type of code, testing connector templates presents unique challenges. Unlike custom code connectors that allow full control over logic, connector templates involve logic embedded in configurations and mappings. Although they may seem simpler, templates depend on complex variable transformations using FEEL expressions and underlying protocol connectors (e.g., REST or HTTP). This introduces a layer of abstraction that can be harder to spot during development, but it’s just as critical to test.
In the following article, I’ll introduce the concept of a connector template and walk through how you can test these mappings to ensure you’re delivering a fully tested, robust product to your customers.
What Are Connector Templates?
In Camunda’s connector ecosystem, there are different types of connectors, based on their degree of “technical freedom”:
Code Connectors: They provide custom business logic, e.g. in form of Java code, and use the Connector SDK to interact with the process engine. They offer the highest level of integration possibilities, since basically every product‘s SDK can be embedded into the connector.
Protocol Connectors: They’re a subtype of Code Connectors and provide technical capabilities based on a technical protocol like HTTP, REST, GraphQL or SOAP. This means you can call, e.g. a certain REST endpoint with it. For that, you need to configure the REST call with endpoint url, headers, body, operation and authentication. You also have a lot of freedom, but limited to the technical protocol below.
Connector Templates: They provide a configuration interface in form of a JSON file, using an existing connector as their base. One can e.g. create an API specific connector based on the existing REST Connector, by providing default values or other configurations, that are translated to the REST connector. Users don’t have to know REST to use it.
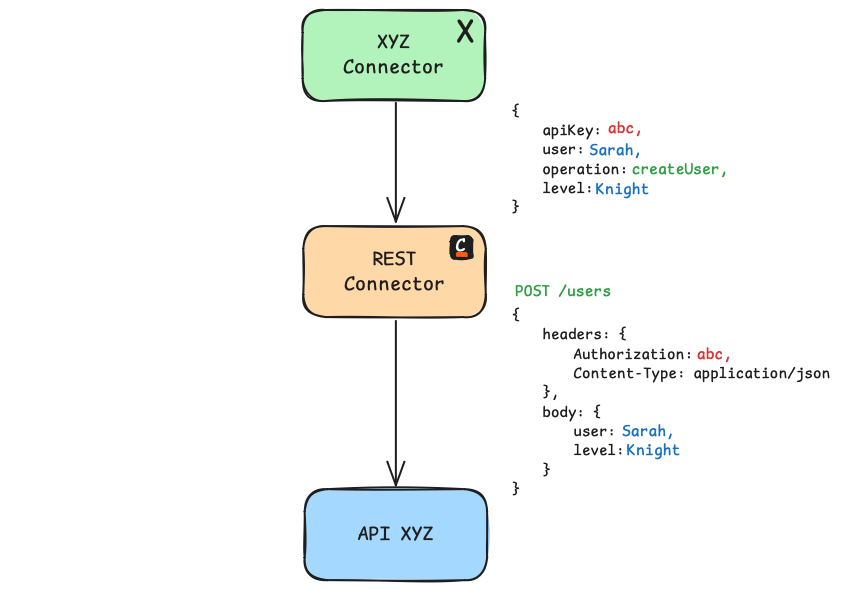
You see in the image, how the input values are mapped to the REST connector:
the apiKey is put into the header for authorization (red)
the operation is mapped to the HTTP operation and endpoint url (green)
the user data is mapped to the request body as JSON (blue)
This way, the connector template can translate business specific values into technical values for the REST call, without the users involvement.
A Technical View On Connector Templates
There are two steps to create a Connector Template:
Connector Binding: Bind your template to an existing connector‘s id
Value Mapping: Map variables to the inputs of the underlying connector
Connector Binding
First we need to tell the engine, to send all of our requests to the REST connector. This is done by using the REST connector’s id in our template.

The process engine routes all active tasks with this id to the REST connector in the connector runtime.
{
  "type": "Hidden",
  "value": "io.camunda:http-json:1",
  "binding": {
    "type": "zeebe:taskDefinition:type"
  }
}
Value Mapping
To configure the REST connector with our business specific values, we bind our user input to variables used to configure the REST connector. In the following example, we add the user input username into the HTTP body of the REST call. The body field is filled by our template — not the user — therefore the field’s type is set to Hidden. We use FEEL expressions to create a JSON value, since the body of our REST call uses this format. You could also create an XML formatted body, if the endpoint expects XML.
"properties": [
  {
    "label": "Name",
    "description": "Your name",
    "type": "String",
    "binding": {
      "type": "zeebe:input",
      "name": "username"
    }
  },
  {
    "type": "Hidden",
    "value": "={ \"user\": username, \"comment\": "Auto-generated" }",
    "binding": {
      "type": "zeebe:input",
      "name": "body"
    }
  }
]
This results in the following request body, if the user sets the username in the modeler.
{
  "headers": {},
  "body": {
    "user": "Sarah",
    "comment": "Auto-generated"
  }
}
More mappings can be created to
add additional headers
modify the request body
change the url endpoint
set the HTTP operation
More configuration options can be found in Camunda’s documentation of protocol connectors.
What is FEEL exactly?
It is an expression language developed by the OMG. Camunda uses it to add logic to your processes, connectors and decision tables. I will cite Camunda’s FEEL documentation here real quick:
Friendly Enough Expression Language (FEEL) is designed to write expressions in a way that is easily understood by both business professionals and developers. In Camunda, FEEL is used to define expressions in the context of BPMN diagrams, DMN diagrams, and Forms. FEEL is specified in the DMN specification of the Object Management Group (OMG).
Why We Should Test Connector Templates
There is an easy rule that I follow when I code something: If you add logic to something, you need to test it. This way you ensure that your logic works as expected and you deliver a working product. Of course you can just manually test it every time you change something, but that approach is error prone and some things can just slip through.
When I developed the Camunda MOCO Connector, I learned quickly that I have to use many FEEL expressions, to configure the REST connector: the payload in the request body, the HTTP operation and the API path have to change, depending on if I want to delete a user or if I want to create an absence. A user deletion is a DELETE call to the /users endpoint, while a scheduled absence is a POST call to the /schedule endpoint with a JSON payload with additional data.
How Can We Test it?
We basically provide a test process that uses the connector template. By starting the connector runtime and a process engine in our test, we can deploy the process, start an instance and check the result from the REST connector. The REST API can easily mocked by tools like Wiremock or Mountebank or any other mocking framework for APIs.
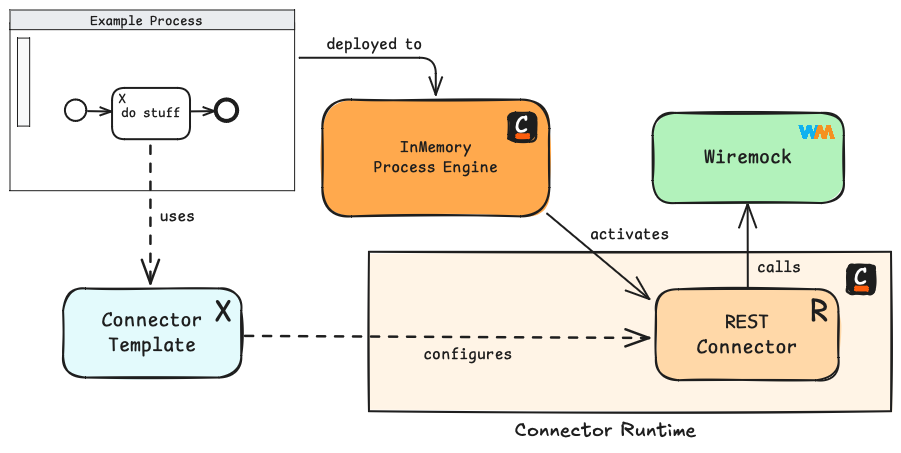
Process Example
First we need a process that we can test. In this example I use the MOCO Connector template. Since we are just testing the variable mappings of our template, the process can be quite easy:

Connector Runtime
Starting the connector runtime is quite easy, you just need to add the dependencies to your test class path and create e.g. a Springboot application to pick them up. The runtime and the REST connector will automatically start with the application.
<dependency>
  <groupId>io.camunda.connector</groupId>
  <artifactId>spring-boot-starter-camunda-connectors</artifactId>
  <version>${zeebe.version}</version>
  <scope>test</scope>
</dependency>

<dependency>
  <groupId>io.camunda.connector</groupId>
  <artifactId>connector-http-json</artifactId>
  <version>${zeebe.version}</version>
  <scope>test</scope>
</dependency>
You can also deploy all test resources from the application during startup if you want by adding the Deployment annotation, pointing to your process model.
@SpringBootApplication
@Deployment(resources = "example.bpmn")
public class LocalConnectorRuntime {

    public static void main(String[] args) {
        SpringApplication.run(LocalConnectorRuntime.class);
    }

}
Test Class
For your test, you need to start the local connector runtime with the REST connector using the SpringBootTest annotation and the Zeebe engine using the ZeebeSpringTest annotation, and setup Wiremock with respective request/response pairs.
The connector runtime uses the default url localhost:25600 to connect to the Zeebe engine, so no configuration is needed.
@SpringBootTest
@ZeebeSpringTest
public class EndpointTest {

    @Autowired
    private ZeebeClient client;

    private String wireMockUrl;

    @RegisterExtension
    static WireMockExtension extension = WireMockExtension.newInstance()
            .options(wireMockConfig().port(50000))
            .build();

    @BeforeEach
    public void setup() throws IOException {
        wireMockUrl = extension.baseUrl();
        WireMock wireMock = extension.getRuntimeInfo().getWireMock();

        // if this request, send response
        MappingBuilder happyPath = WireMock.post("/endpoint")
                .withRequestBody(new EqualToJsonPattern(request, true, false))
                .willReturn(okJson(response));

        wireMock.register(happyPath);
    }

    @Test
    public void test_operation_is_mapped_as_expected() {

        // when
        ProcessInstanceEvent instance = client.newCreateInstanceCommand()
                .bpmnProcessId("example")
                .latestVersion()
                .variables(Map.of(
                    "apiBaseUrl", wireMockUrl,
                    "username", "Sarah")
                )
                .send()
                .join();

        waitForProcessInstanceCompleted(instance);

        // then
        assertThat(instance)
                .hasVariableWithValue("variable", expectedValue)
                .isCompleted();
    }

}
The assertion checks for a completed process instance and a result variable that we set in the connector. Since everything is as expected, without any incidents, we can assume that our template works as expected.
Conclusion
With these easy steps you can verify that your connector template and the variable mappings are working as expected. You only need a way to start the process engine and the connector runtime, and mock the API you want to test against. Happy Testing!
If you want to see some working examples, feel free to check out my MOCO Connector Template where I use this testing pattern.
Further Resources
Here is a compact list of resources I used for this article:
An introduction to FEEL expressions (Camunda Docs)
An introduction to Connector Templates (Camunda Docs)
The Camunda REST Protocol Connector (Camunda Docs)
Testing your processes with Spring Zeebe Test (GitHub Repo)
How to use Wiremock with SpringBoot (Wiremock Docs)
The Camunda MOCO Connector (GitHub Repo)
The Camunda Connector Runtime (GitHub Repo)
A Deep-Dive into the Architecture of Connectors (Camunda Blog)